Documentation: Simple Javascript XML Slideshow

Installation

Main Setup

XML Setup

Themes and Changing the Look

Other Questions You Might Have

Wordpress Plugin

Feel free to use the above links to browse quickly to a specific section you have questions about.

Thanks for purchasing my product from CodeCanyon! I really appreciate it. This document should guide you in all the areas you have questions. Feel free to email me contact@israeljernigan.com if you have any trouble or are confused. I'd be happy to try and help you.


SJXS: Installation

Just give me the lowdown

Here is all the base code you need. If you want further exploration please look through the rest of the installation sections. This just shows exactly what would be needed for those who want to figure it out or know how this typically works. The code below is using the default settings. Be sure to change out the paths to the files to where you are storing them on your server.

Header Files

	<script src="path/to/your/file/jquery.1.4.min.js" type="text/javascript"></script>
	<script src="path/to/your/file/jquery.easing.1.3.min.js" type="text/javascript"></script>
	<script src="path/to/your/file/timer.min.js" type="text/javascript"></script>
	<script src="path/to/your/file/jquery.sjxs.1.3.min.js" type="text/javascript"></script>

Javascript

<script type="text/javascript">
	$(document).ready(function(){
		$('.SliderContainer').simple_js_xml_slideshow({
		container: ".sjxs_sliding_content",
		xml_url: "path/to/your/file/js/simple_jxs/simplexmlslideshow.xml",
		transition_time: 7,
		transition_speed: 750,
		transition: "fade",
		show_loading: "true",
		random_start: "false",
		stop_on_click: "true",
		include_prev_next: "true"
	});
});
</script>

HTML

<div class="SliderContainer">
	<!-- !start of slider -->
	<div class="sjxs_sliding_content"></div>
	<!-- !end of slider -->
</div>

CSS

<style media="screen">
.SliderContainer .sjxs_sliding_content {
	position:relative;
	float:left;
	width:590px;
	height:300px;
	overflow:hidden;
	border:none;
	margin:0;
}

.sjxs_sliding_content .sjxs_col-group {
	position:absolute;
	display:none;
	top:0;
	width:100%;
	height:100%;
}

.sjxs_sliding_content .sjxs_col-group.current {
	display:block;
}

.sjxs_current_img,.sjxs_next_img {
	position:absolute;
	top:0;
	left:0;
	z-index:150;
}

.sjxs_current_img {
	z-index:250;
}

.sjxs_status {
	position:relative;
	background:transparent url(../images/loaders/ajax-loader-fb.gif) center center no-repeat;
	width:100%;
	text-align:center;
	height:50px;
	display:block;
	z-index:500;
	margin:15% auto 0;
}

.sjxs_hide {
	display:none!important;
}

.sjxs_sliding_content .sjxs_next,.sjxs_sliding_content .sjxs_prev {
	position:absolute;
	display:block;
	width:21px;
	height:21px;
	z-index:500;
	color:#FFFFFF;
	padding:3px 5px;
	cursor:pointer;
	text-align:center;
	text-shadow:0 1px 1px #444;
	bottom:0;
	filter:alpha(opacity=74);
	-moz-opacity:0.74;
	-khtml-opacity:0.74;
	opacity:0.74;
	background-color:#444444;
}

.sjxs_sliding_content .sjxs_next {
	right:0;
}

.sjxs_sliding_content .sjxs_next:hover,.sjxs_sliding_content .sjxs_prev:hover {
	background-color:black;
	color:#fff;
	text-shadow:0 1px 1px #000;
}
</style>

XML File

<gallery>
	
	<image>
		<url>path/to/your/images/slideshow/01_slide.jpg</url>
	</image>
		
	<image>
		<url>path/to/your/images/slideshow/02_slide.jpg</url>
	</image>
			
	<image>
		<url>path/to/your/images/slideshow/03_slide.jpg</url>
	</image>
		
	<image>
		<url>path/to/your/images/slideshow/04_slide.jpg</url>
	</image>
	
	<image>
		<url>path/to/your/images/slideshow/05_slide.jpg</url>
	</image>
		
</gallery>

Which files don't I need?

Inside the folder you downloaded for this file, or that is included as an extra plugin folder within your theme, you do not need to upload the folder _docs_files. You also do not need to upload the file examples.htm. And once you know which kind of xml file you are using simply upload that specific one. In the XML Setup section is more documentation on what I mean by that.

Where should I put these files?

You can put the downloaded folder inside of your the folder where you store either your javascript files or image files on your server. SJXS is able to be used wherever, but is best used when all of it's files are kept together (unless otherwise recommended below). If you want to seperate the files you will run into trouble getting all the files to work as expected. If you run into any issue, please feel free to comment on the discussion form or email me at contact@israeljernigan.com.

You will need to reference specifically these javascript files.

<script src="your/path/jquery.1.4.min.js" type="text/javascript"></script>
<script src="your/path/jquery.easing.1.3.min.js" type="text/javascript"></script>
<script src="your/path/timer.min.js" type="text/javascript"></script>
<script src="your/path/jquery.sjxs.1.3.min.js" type="text/javascript"></script>

What about the code to enable this?

Below is just a simple example. You can put the code right above the html </body> tag. In the other sections in the documentation this is explained more in-depth in those areas.

<script type="text/javascript"> 
	$(document).ready(function() {
		
		//Start the slideshow for the first gallery
		$('.SliderContainer').simple_js_xml_slideshow({
			
			xml_url:'your/path/simplexmlslideshow.xml.php',
			transition:'fade',
			transition_speed: 1000
			
			});
			
	});
</script>

How do I get the images setup?

This slideshow is slightly different than normal slideshows. Most take html that's already on the page and just convert it. This slideshow is more for dynamic content that's changed using xml. That doesn't mean you can't use what you've already created. It's just a little different to setup. Check out the section SJXS: XML Setup for more on how to do this.


SJXS: Main Setup

What HTML is required?

This is the basic html needed to get started with your slideshow. Simply place this code wherever you want your slideshow to appear.

<div class="SliderContainer">
	<!-- !start of slider -->
	<div class="sjxs_sliding_content">
		
	</div>
	<!-- !end of slider -->
</div>
						

How do I change the transition, speed, etc.?

At the bottom of the jquery.sjxs.1.3.min.js file are the default options that can be used for this file, you can change the global variables there.

And there are brief descriptions of what they do next to each. The xml file has more expanded descriptions and examples.

All of the examples are javascript so they will need to be put inside of <script /> tags. Below are a few examples of how to use the settings.

Basics For Setup

<script type="text/javascript"> 	
	//Start jQuery	
	$(document).ready(function() {	
					
		//Start the slideshow 
		$('.SliderContainer').simple_js_xml_slideshow();

	});
</script>

The next few examples will assume that you will put these settings inside of <script /> tags like the basic example.

Example of using all the settings:

$('.SliderContainer').simple_js_xml_slideshow({
	container: ".sjxs_sliding_content", 
	xml_url: "js/simple_jxs/simplexmlslideshow.xml",
	transition_time: 3, 
	transition_speed: 750, 
	transition: 'fade',  
	show_loading: 'true', 
	random_start: 'false',
	stop_on_click: 'true',
	picket_fence_cnt: '15',
	include_prev_next: 'true',
	prev_button: '<',
	next_button: '>'

});

Example of changing what xml file is used:

$('.SliderContainer').simple_js_xml_slideshow({
	xml_url: "js/simple_jxs/simplexmlslideshow.xml"
});

Example of changing how the transition looks:

This will make all of the transitions look like normal wipes. Like, wipe left or wipe down/up.

$('.SliderContainer').simple_js_xml_slideshow({
	xml_url: "js/simple_jxs/simplexmlslideshow.xml",
	transition:'picketFenceDown',
	picket_fence_cnt: 1
});

Example of changing the transition speed:

This will tell the slides to stay on screen for 8 seconds and then transition to the next slide in 547 milliseconds. Also, it's using one of the picket fence transitions and so the picket_fence_cnt is set to 15.

$('.SliderContainer').simple_js_xml_slideshow({
	xml_url: "js/simple_jxs/simplexmlslideshow.xml",
	transition:'picketFenceCornerWipe',
	picket_fence_cnt: 15,
	transition_speed: 547,
	transition_time: 8
});

What transition options are there?

Below are listed the transition options for the settings transition. These are currently the transitions included. More are planned to be added. There is a set of transitions I call Picket Fence that allow the image to appear like it's transitioning like a fence.

If you want transitions that behave like what you expect and don't appear cut. (what I call picket fenced) Then try setting the picket_fence_cnt option to just 1. All the transitions will behave like you would expect. There are some examples of what I'm talking about above.

transition

  • fade: Simple opacity change from 0 to 100.
  • easeBack: A slide from right to left with little snap back at the end of the transition.
  • easeBounce: A slide from right to left with a 'bounce' snap at the end of the transition that emulates bouncing on something.
  • picketFenceUp: The slide will be split into multiple pieces and fade in towards the top.
  • picketFenceDown: The slide will be split into multiple pieces and fade in towards the bottom.
  • picketFenceWipe: The slide will be split into multiple pieces and fade each one as it wipes onto the screen.
  • picketFenceWipe2: Similar to the first wipe except it's much more blended together and much more gradual.
  • picketFenceCornerWipe: The slide will be split into multiple pieces and fade in from the top corners.

How do I change the buttons?

There are two options for changing the buttons, prev_button and next_button. Both of these can have html or basic text.

Example of changing the buttons:

This will change the buttons to say 'Prev' and 'Next' instead of the normal '>' and '<'.

$('.SliderContainer').simple_js_xml_slideshow({
	prev_button: 'Prev',
	next_button: 'Next'
});

SJXS: XML Setup

Where do I put the xml file?

You can call the xml file from anywhere. Simply follow the example shown in this section above, about changing the xml file.

Be aware that it's best to use absolute urls for the xml file itself and for the image urls that are used inside the xml file.

$('.SliderContainer').simple_js_xml_slideshow({
	xml_url: "js/simple_jxs/simplexmlslideshow.xml.php"
});

What does the XML file need to look like?

Below are a few examples of how the xml file can be configured.

XML file with just the basics

						
<gallery>
	
	<image>
		<url>http://www.israeljernigan.com/flashden/image_gallery/images/DSC_0105.jpg</url>
	</image>
		
	<image>
		<url>http://www.israeljernigan.com/flashden/image_gallery/images/DSC_0113.jpg</url>
	</image>
			
	<image>
		<url>http://www.israeljernigan.com/flashden/image_gallery/images/DSC_0120.jpg</url>
	</image>
		
	<image>
		<url>http://www.israeljernigan.com/flashden/image_gallery/images/DSC_1425.jpg</url>
	</image>
		
</gallery>

XML file with some settings added

<gallery 

	transition_time="5" 
	
	transition_speed="750" 
	
	transition="easeBack" 

>
	<image>
		<url>http://www.israeljernigan.com/flashden/image_gallery/images/DSC_0105.jpg</url>
		<link>http://israeljernigan.com/</link>
	</image>
		
	<image>
		<url>http://www.israeljernigan.com/flashden/image_gallery/images/DSC_0113.jpg</url>
		<link>http://israeljernigan.com/</link>
	</image>
			
	<image>
		<url>http://www.israeljernigan.com/flashden/image_gallery/images/DSC_0120.jpg</url>
		<link>http://israeljernigan.com/</link>
	</image>
		
	<image>
		<url>http://www.israeljernigan.com/flashden/image_gallery/images/DSC_1425.jpg</url>
		<link>http://israeljernigan.com/</link>
	</image>
		
</gallery>

Can I automatically generate XML with PHP?

Yes you can! I've included another plugin I've created that will allow you to create xml files with php. It's specifically setup to work with this plugin. Please do not use it with any other project. If you would like to, you can contact me or purchase it online.

The file is called simplexmlslideshow.xml.php and should be in the same folder as the xml file. There are two ways to use the file that's included.

1. (recommended) You can place it inside of the folder where you images are located

Simply place the xml file inside of the folder that has all your images you want to use. Then reference the php file inside that folder when you setup the slideshow. And this will pull all the images for you automatically. You don't have to change anything in the php file.

$('.SliderContainer').simple_js_xml_slideshow({
	xml_url: "js/simple_jxs/simplexmlslideshow.xml.php"
});

2. You can manually tell the xml file where your image folder is located

Inside of the simplexmlslideshow.xml.php file there is a commented section called CONFIGURATION. It has a more in-depth description of what to do. But basically you need to set two php variables in that file.

  • $folder_path: For example: $folder_path = '/user/me/example.com/images/';
  • $web_path: For example: $web_path = 'http://example.com/images/';

Once that is done correctly you can reference that php file when you setup the slideshow, and it should work as expected. But the first way is way more full proof, and is more likely to work the first time.

$('.SliderContainer').simple_js_xml_slideshow({
	xml_url: "js/simple_jxs/simplexmlslideshow.xml.php"
});

How do I make the images clickable?

To make the images clickable simply place the link you want for each image in an href attribute on each image tag in the xml file you are creating.

XML file with image links

						
<gallery>
	<image>
		<url>http://www.israeljernigan.com/flashden/image_gallery/images/DSC_0105.jpg</url>
		<link>http://www.linksite.com/</link>
	</image>
		
	<image>
		<url>http://www.israeljernigan.com/flashden/image_gallery/images/DSC_0113.jpg</url>
		<link>http://www.linksite.com/url/to/anywhere/DSC_0113.jpg</link>
	</image>
			
	<image>
		<url>http://www.israeljernigan.com/flashden/image_gallery/images/DSC_0120.jpg</url>
		<link>http://www.linksite.com/url/to/path/</link>
	</image>
		
	<image>
		<url>http://www.israeljernigan.com/flashden/image_gallery/images/DSC_1425.jpg</url>
		<link>http://www.linksite.com/url/to/image/DSC_1425.jpg</link>
	</image>
		
</gallery>

SJXS: Themes and Changing the Look

How do I change the look?

There is a css stylesheet that is used to change the look and actually make the slideshow work as expected. It is located in the css folder and called styles.css. Without it the slideshow wouldn't even work. Inside the css stylesheet there are plenty of comments to help explain what each class controls.

Also, I'm going to try and show a visual representation of what html is generated and the css classes that are used to control the elements.

<!-- The container that sets the boundaries of your image sizes. (.sjxs_sliding_content)-->
<div class="sjxs_sliding_content">
	
	<!-- The previous and next buttons (.sjxs_prev) and (.sjxs_next)-->
	<a href="javascript:void(0);" class="sjxs_prev">&lt;</a>
	<a href="javascript:void(0);" class="sjxs_next">&gt;</a>
	
	<!-- Status is hidden with using 'sjxs_hide' (.sjxs_status)-->
	<div class="sjxs_status sjxs_hide"></div>
	
	<!-- Here to allow more variation if you need it (.sjxs_group_container)-->
	<div class="sjxs_group_container">
	
	<!-- This allows the overflow to work as expected, by default it sets the width and height to be the same as the 'sjxs_sliding_content' (.sjxs_col-group) -->	    
		<div class="sjxs_col-group current">
		
			<!-- This is the div that is being shown (.sjxs_current_img) -->
			<div class="sjxs_current_img" style="left: auto; display: block;">
				<img src="images/header_gallery/photo01.jpg"/>
			</div>
			
			<!-- This is the div that is being hidden, and faded into (.sjxs_next_img) -->
			<div class="sjxs_next_img" style="left: auto; display: none;">
				<img src="images/header_gallery/photo02.jpg">
			</div>
		</div>
	</div>
</div>

How do I integrate this with my look?


SJXS: Other Questions You Might Have

Can I add multiple slideshows on the same page?

Totally! You simply need to use unique classes for your html. Below is an example of what that means. See the difference?

Step 1: Unique html classes

<div class="SliderContainer">
	<!-- !start of slider -->
	<div class="sjxs_sliding_content">
		
	</div>
	<!-- !end of slider -->
</div>

<div class="SliderContainer2">
	<!-- !start of slider -->
	<div class="sjxs_sliding_content2">
		
	</div>
	<!-- !end of slider -->
</div>

Step 2: Javascript

Then reference the unique classes for each of the slideshows. The first example (.SliderContainer) references the first html example above, and the same for example (.SliderContainer2). I hope that helps. If you are still confused, simply contact me at contact@israeljernigan.com.

$('.SliderContainer').simple_js_xml_slideshow({
	container: ".sjxs_sliding_content",
	xml_url: "js/simple_jxs/simplexmlslideshow.xml"
});

$('.SliderContainer2').simple_js_xml_slideshow({
	container: ".sjxs_sliding_content2",
	xml_url: "js/simple_jxs/simplexmlslideshow.xml"
});

Are there other transitions I can use besides those included?

Of course! There are a few options that are available for use that are included listed above. If there are any others you would like added that you feel need to be included but are not, please contact me at contact@israeljernigan.com and I will gladly add them to the repertoire.


SJXS: Wordpress Plugin

What are the requirements?

To use this plugin you will need a website hosted with Wordpress. You can find out the requirements needed at Wordpress.org. And to know how to install Wordpress you can find instructions on that Wordpress.org as well.

How do I install this plugin?

Simply upload the unarchived plugin files into the wp-content/plugins folder. In-other-words place the simple_sjxs folder provided in the WP_plugin folder into the wp-content/plugins folder.

Taken from the instructions on wordpress.org - http://codex.wordpress.org/Managing_Plugins

Manual Plugin Installation

To install a plugin that is not in the plugin browser, the following are the general directions to follow. Be sure and follow the specific instructions provided by the Plugin author. Remember: BACKUP - just in case.

  1. Read through the "readme" file thoroughly that usually accompanies a plugin, or the website article from where you found the plugin. It is often helpful to print out the instructions so you can check off the installation steps as you complete them.
  2. Upload the plugin to the wp-content/plugins folder in your WordPress directory online.
  3. Make any changes to templates or files as required by the Plugin instructions including adding Plugin template tags.
  4. Activate the Plugin:
    1. Access the Plugin Panel in your Administration Panels
    2. Scroll down through the list of Plugins to find the newly installed Plugin (if not visible, start from the beginning to check to see if you followed the instructions properly and uploaded the file correctly).
    3. Click on the Activate link to turn the Plugin on.
  5. Continue making any modifications necessary from the "readme" file instructions to make the plugin's actions meet your needs

Where do I put the images?

Start by going to the post/page you want to add iamges to and lcik on the add image icon.


This screen should show up once clicked. And it will allow you to upload however many image you would like at the same time.


Once uploaded you will be able to see something like this, and this will mean you were successful. And that's all that is needed.

What is the shortcode needed?

You place this shortcode inside the the WYSIWYG editor in your Wordpress installation.

The basics:

This is all you need once the images are uploaded. The shortcode will place any of the defaults you have set on the plugin settings page. It will also generate the xml file for you.

[sjxs_slideshow]
The advanced (with options):

The alternative is to start adding any of the settings you want to change. All of the options can be seen above.

[sjxs_slideshow transition="fade" transition_speed="755"]

Can I set default settings?

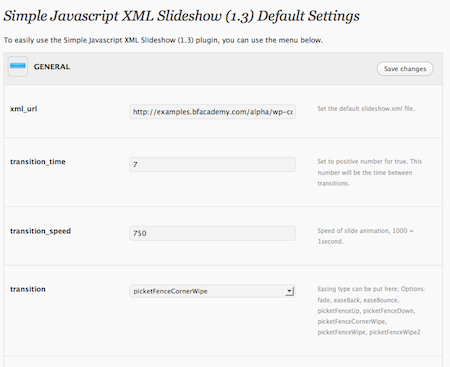
The settings page lists all the options you can change to apply as defaults for any shortcodes you use.


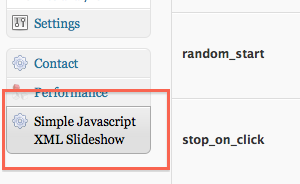
Once installed and activated the plugin will be placed at the end/bottom of the menus.